
So I've been wanting a fur vest for a while and every time I go to thrift store I look for one or a jacket I can cut the sleeves off to make one. But being unsuccessful so far a trip to the fabric store inspired me to make my own. I was going to Fabricland to buy sewing tap and I tripped upon some faux fur on sale. (by the way if you don't like to sew, hemming pants etc, look into sewing tape! all you need is an iron!)
So begins my little project! All I bought was the fur and fabric, the rest of the supplies I had kicking around.
SUPPLIES:
3/4 metres of grey faux fur ($14) , Ruler, Scrap paper, marker
Extras:
1 metre of the printed fabric for the lining ($3)
extra fabric for lining (I ran out of the printed fabric so I used an old shirt)
Fabric Ribbon
Glue Gun and Glue sticks
Old ripped leather glove
buckle
- So I brought it home and measured around my arms for the the arm holes and my between my shoulders. With the arm measurements I made an almond shape out of scrap paper to trace on the fur (go smaller than you think because you can always make it bigger).
- I traced the the following pattern on the fur. Start by folding fabric in half to find centre. Then take the shoulder measurement and 2-3 inches from the top draw a shoulder line. Trace the arm holes at each end of the line see stencil.).

- Cut out only the arm holes slip your arms into the holes and make any other alterations to fit you better. If you`re not picky you can wear this piece just as is but I made alot of other alterations.
* TIP: when cutting fur cut as close to the backing as possible so you don`t cut the fur off. Or part the fur before cutting. An exacto knife would also be a great option.


The alterations I made were:
 I made the space between the shoulders smaller and tilted holes towards line to get more of a racer back look.
 I wanted this to be really baggy so I can wear with big knits and jackets so I made arm holes bigger.
I also trimmed the corners off to make the vest less asymmetrical and less bulky.
 I used the pink fabric I bought and lined the jacket. You can sew but I was kinda lazy so I used a glue gun instead. I also ran out of the pink fabric so I cut up a old black satin shirt that I was going to donate and used it.
 To glue the lining on I just ran the glue around all the edges and around the arms I laid the fabric flat and trimmed the edges and arm holes.
I covered the seams with some fabric ribbon I had kicking around and again I just glue gunned it around the edges and made an interesting Y pattern on the inside.
*Don`t be afraid to use cool and contrasting fabrics for the lining. I also glued some leather hearts on the back from some scrap pink leather I had. I love when people see a flash of it, it`s a cute quirky detail!
 I also thought it was really loose so I used scrap leather from a pair of ripped pink leather gloves I was gonna throw out and a a buckle (also from the black shirt I used for the lining) and made an interesting closure to gather the back. This piece was the only sewing I did on the vest.
You can use buttons, ribbons or a belt to get this look!
Voila!
this looks awesome over bulky sweaters, with leggings, turtlenecks, over dresses...and so much more! This project is super easy and you can put a little or alot of details on it. You don`t need to know how to sew either.
If you need any help or have any questions please don`t be afraid to comment you email me!
NEXT PROJECT
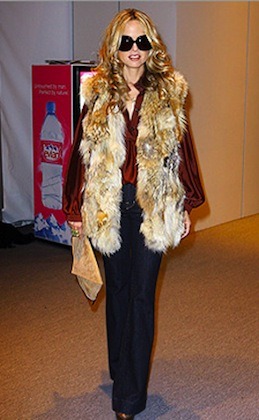
Seeing how easy this was to make I will buy some better fur and attempt to make something like this a-la-Rachel-Zoe:
No comments:
Post a Comment